Mid-Nor, Liktor

by Oli aka HonourGuard

posted by Oli, HonourGuard, silver leaf

Mid-Nor, Liktor

this is the latest mini I have finished, I am working on a little Rackham unit for the next years competitions. 

Lets see if I can finish 5-8 Minis with the same style and with a big base.. I have to much ideas.. :D

I invested very much time in the textures, especially in the skin, I had to mix the main colour 6-8 times, but I think I am happy with the final result^^

You can klick on all pictures to see them big


I know the photo quality isn't the best.. sorry :P

Best regards Oli

Various inspirations...

by Roman aka jar

posted by roman, jarhead, kong

Just wanted to show you some things i think they are really, really inspirational...

First check out Allan Carrasco's new female sculpt!!!

Mario found this great stuff over on Hasslefree!! Thanks for sharing, Mario!

That's it for a sunday... :)
Keep on happy painting!
Regards
Roman

Finished various stuff...

by Roman aka jar

posted by roman, jarhead, kong

It feels good to have the muse back in my hairy gorilla chest, my heart bumps in the same rythm as she dances. I feel that i am still not completly with full strenght but i am regaining powers... main powers are used these days in finishing stuff up :)

First, a shot of a little Confrontation miniature. This will be an exchange miniature i did for big A from Graz. Nothing very special but some kind of melancholy in it... still not sure if it is already finished yet, that is why i did not take final photos yet... we'll see..  the bone on the base is the bonepiece from a caiman jaw, yeah that sounds great i know...


Another finished piece is something small i did get from Allan Carrasco, a great sculpt as always by his masterful hands (and small this time). It is called PAYDAY and will be a tiny gift to mati but don't tell him... i know he only looks pictures and doesn't read my blabla so i can write here about it, but you got to keep this hush, hush...


Photos are ok, but not really good, but i am not stressing myself these days because of photos... i keep me far away from stress :)

Keep on happy painting!
Best Regards 
Roman

PS: And don't forget to grab your chance to win a miniature!!!

Spanish Admiral up to ebay...

by Roman aka jar

posted by roman, jarhead, kong


The latest painted spanish Admiral by Pegaso is now up to ebay. You can find the auction if you are not to scared to look behind this link!

Happy Bidding!

Death Corp Comissar finished...

by Roman aka jar

posted by roman, jarhead, kong

Aloa.

Finally the Death Corp of Krieg Comissar on horse is finished. Lovely model to paint, my first Death Corp ever, but i guess i have to do some more as this was really Happy Painting and a pure joy to swing the brush on... hope you like him and i hope the comissioner likes him too:

Death Corp of Krieg Comissar, 28 mm, Forgeworld


The last shot is made in my cabinet with lightning by the camera so you can make yourself a better picture of the miniature as my photo skills still suck :)

Keep on happy painting!
Regards
Roman

Kong's Work in progress report

by Roman aka jar

posted by roman, jarhead, kong

Aloa.
Again a little progress report - i am waiting. Waiting for 2K Water Effect to dry on 2 bases. Meanwhile i started painting a pig sculpted by Allan Carrasco and take a look on another great Red Box Games Barbarian... here you can find an overview, photosession on the balcony:

Spanish Admiral finished...

by Roman aka jar

posted by roman, jarhead, kong

I finally have finished something again. The spanish Admiral bust by Pegaso is done. Still there are some places where i feel there is much improvement but I had to declare him finished as i am really happy with the overall result. Hope you like it too!

Spanish Admiral, 1:9, Pegaso Models

Here you can find 2 shots made in my cabinet, done with lightning:

So far from the Gorilla Mountains, keep on happy painting!
Regards
Roman

Work in Progress and Parcel Talk

by Roman aka jar

posted by roman, jarhead, kong

I started packing another Massive Voodoo Care Parcel - here is the further progress, some WIP Bases, a socket and some miniatures wandered inside so far:


And another Work in Progress of the Death Corp of Krieg Rider guy - guess soon he is finished:

More Advertisment...

by Roman aka jar

posted by roman, jarhead, kong

Really boring showing chocolate advertisment on a painting blog... but Cadbury Ads rock - enjoy:

I've been waiting for this moment all my life...

by Roman aka jar

posted by roman, jarhead, kong

The muse is back on my neck whispering in my ear... thanks to Piotr who showed me this great and awesome motivational video:

I've been waiting for this moment all my life... today i had a brilliant idea and Piotr's video recommandation is a sign by the gods to execute it! Thanks brush brother :)

Win a Miniature - Celebrating the 400!

by Raffa


Posted by Raffa, Picster, Capuchin,....


400!!! What a nice number! Thank you all!!!
Some moments ago the 400th subscriber joined the painting jungle!

As it is almost some kind of tradition you get the chance to win a miniature again!

The mini you can win this time comes from Robert aka. muhani.
This nurse will help you getting back your painting spirit.
Thanks again to all the people that join the jungle and help it grow and spread the word.
This is how the jungle can exist and all the funny and weird inhabitants get happy :)

We really love our "community", lots of different faces, people, funny events and you grow with us as the uncreative, power-sucking, lame places of the life gets overgrown with inspiring jungle plants and new life! Your are the folks that seeds their ideas into the grey places and help to create new colors and places of peace and meditational painting joy.

THANKS!


So now to the tricky part... how to get this miniature?

You have to be a follower/subscriber of our jungleblog (check out on the right)
OR
You have to be a fan of Massive Voodoo on Facebook: CLICK HERE

THEN
Write a mail to 'PICSTER(at)MASSIVEVOODOO(dot)COM' with the Subject 'MASSIVE GIFT' (important for me so i can sort out! Emails without this subject will be deleted) and your Username (on Facebook or as a Follower, so we can check it)

In about 2 Weeks (12th November 2010) i will randomly ( http://www.random.org/ ) choose out one of the mails and this person will get the mini!

You don't have to pay shipping or anything, it's a completely free gift as a thanks!

Take your chance!

Cheers,
the Massive Voodoo Crew, UH UH UH AHHHHH!!! UHH?

Work in Progress again...

by Roman aka jar

posted by roman, jarhead, kong

Workshop Announcement - First Class in 2011

by Roman aka jar

posted by roman, jarhead, kong


This time it is a DELUXE Class in in Blumberg-Achdorf, Germany. 

As nobody knows where Blumberg-Achdorf is here comes a little describtion:  1~2 hours with the car to Freiburg, Stuttgart, Konstanz, Lindau, Zürich and Basel.

What means DELUXE?
The class takes part in a little House were everyone can sleep and stay. Also there will be a cook who makes meals all time long for all of us. This adds a little amount of money on top of the class costs, but i guess this is deluxe :)


If you are intrested in taking part in this DELUXE class and have a great weekend with us follow this link to get all the information you need to know:
Click me big time!

The class is again only for german speakers. Dogs and cats are not allowed. Monkeys yes!

Finished Miniatures out of the jungle...

by Roman aka jar

posted by roman, jarhead, kong

This time it is me with the blogging news from others.

Raffa and Robert did both finish another miniature each, one of them will soon be the one you can win as a follower/subscriber in the jungle or on facebook as soon as we reach 400 Subscribtions, as i am writing this the counter is at 399!!

I am too lazy to tell you yet which one is painted by whom - surprisé!


:)

Kong's Work in Progress...

by Roman aka jar

posted by roman, jarhead, kong

Work in Progress... click to enlarge... hope you like it?
Muse? Dance avec moi :)

quote of today...

by Roman aka jar

posted by roman, jarhead, kong
"All true artists, whether they know it or not, create from a place of no-mind, from inner stillness." Lao Tzu

Tutorial - Basic painting camouflage

by Roman aka jar

posted by roman, jarhead, kong

Hello.

This is another really old article of mine which i now will translate. It is from the year 2006 or 2007, not really sure anymore. I want to say sorry for mould lines you may see and real bad photos.

Again, always check some references before painting something - here is a great inspiration and a big archive of camouflage patterns on tanks and on infantery clothes.

Music for those who like music!


1. Simple Desert Camouflage

Used colours:
Vermin Brown (VB)
Desert Yellow (dy)
Khommando Khaki (kk)
Bestial Brown (bb)
chaos black (cb)
schorched brown (sb)
skull white (sw)

Priming has been black with some grey drybrushing. I used to do it this way 3~4 years ago. Today i would recommand this priming technique.

First basecolour has been a mix from vb/cb (70/30):

Second step has been a gently highlighting by mixing in desert yellow (dy) into the mix:

Pure dy was now used on the upper areas of the model:

I took Kommando Khaki to strengthen the highlights:

Then i took bestial brown and started to draw the camouflage.I did small dots of chaos black, followed with white ones. For making nice dots i would recommand this article to you!

 After finishing the complete model up it looked like this:


2. Simple Urban Warfare Camouflage

Colours i have used:
chaos black (cb)
bestial brown (bb)
codex Grey (cg)
fortress grey (fg)
skull white (sw)
schorched brown (sb)

Priming has been black with some grey drybrushing. I used to do it this way 3~4 years ago. Today i would recommand this priming technique.

First i have used a mix of  50/30/20 - cb/sb/cg for the basecoat. I planned to have some greyish, warm black here. This is a little hint to you. Mixing in different colours in your blacks makes them more alive and easier to handle. Simply but some other intresting colours into your mix.

 Next i mixed in some more Codex Grey to do the first gentle highlights:

Then used Fortress Grey to do some strong highlights on the clothing:

I used the basic colour of 50/30/20 - cb/sb/cg to draw some dark camouflage spots. I used Skull White and Fortress grey 50/50 to paint the bright spots.

The final step has been a thin glaze of schorched brown over the complete clothes to bring it all together and make it look more gritty:

After finishing the complete model up it looked like this:


3. Painting Jungle Camouflage

This following describtion is from the USMC - Iwo Jima Step by Step you find here.

I did start my work on the helmets camouflage by taking these 2 references as a master: Click! and Click!
But in the back of my head was still this reference - Click!

I did start the camouflage pattern by sketching the brown areas. I did use Schorched Brown for this, as far as i can remember i did also use the 2nd skin shadowtone which still was left on my wetpalette (following photo). Also i did start the greenish camouflage by using a dark green mix from yellow olive and camo green. As i saw it was getting to dark i mixed in more camo green.


I now did paint the sketch up with the colours i have used before. If you do so and unclean areas appear do another layer on top of it to have it oquape. In the upper area of the green and brown i used the same tone just a bit brighter.


I did choose this photo as a reference and there the cloth and camouflage on the helmet is really worn out and dirty. The dirt comes later on but for giving this are a more worn look i did use a tiny amount of yellow sandish pigments a bit of Bleached Bone, Kommando Khaki, Desert Yellow and Graveyard Earth in the mix as a glaze and tipped it on the upper areas in several goes for making it dusty and washed into eachother.


Final words

I hope you like this article, even it is old already. I guess the last example of the jungle pattern shows that there is plenty of room of investing time into your camouflage work. Everything depends on your patience and the amount of miniatures you have to want to paint up. Remember - check some references before.

Keep on happy painting!
Regards
Roman

Big Photo Gallery of the german GD 2010

by Roman aka jar

posted by roman, jarhead, kong

Hiho.
At the german Painting Forum "das-Bemalforum.de" you'll find a big gallery of good photos of mostly all entries from the german Games Day. Big thanks to Devil Ray! 

Keep on happy painting!
Regards
Roman

Tutorial - Using the Masq Mini tube tool

by Mati

posted by Mati, Badsmile, orang utan
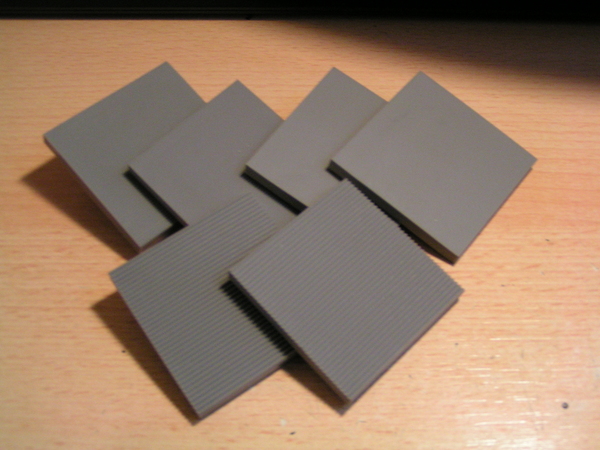
Using the Masq Mini tube tool


Hey there fruity jungle friends ! Today I would like to show you a very brief tutorial on how to use the new and fantastic tube tool sold by masquerade miniatures.


First you will think....what do I need this for ? There are guitar strings and other alternatives BUUUUT you haven't seen what it can do yet !
I was totally amazed. And if you put a little braingrease to the whole thing you will even figure out how to do ammo belts and alike with this little magical tool.


You can use whatever putty you like, I would recommend using pro create or green stuff mainly though as sculpey tends to be a bit too soft and stuff like magic sculpy or milliput would probably leave too much dirt in the tool.


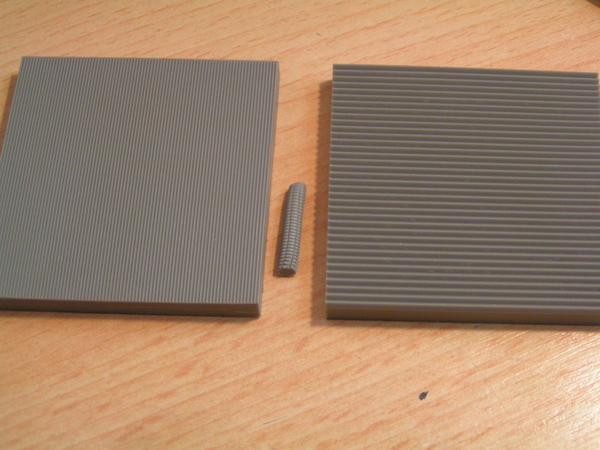
There are a few basic concepts you have to understand to work with the tool. The first is that you need a plain surface to work with it as you will have to use the edges to get regular results on your tubes.
The second one is that you are able to combine the different sizes and the plain and the ripped side of the tool to achieve very different results.
Pressure is another concept of the whole tube tool, very funky things can be done if pressure is applied just in the right moment.
Angles are another thing you can try when using the tool to do "snakechain" tubes for example.

So lets list them up shortly:

  1. plain surface
  2. combination
  3. pressure
  4. angles

So let's start with the basics....( 
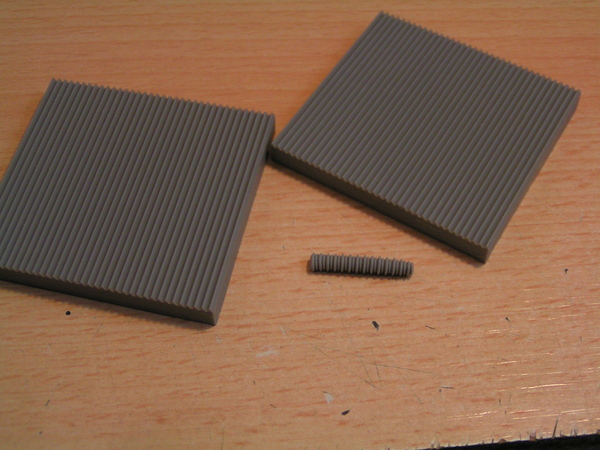
I will mainly use the biggest of the tools to make it easier to see )

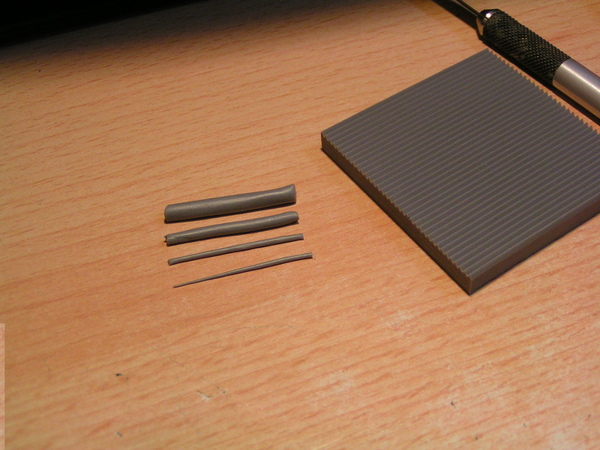
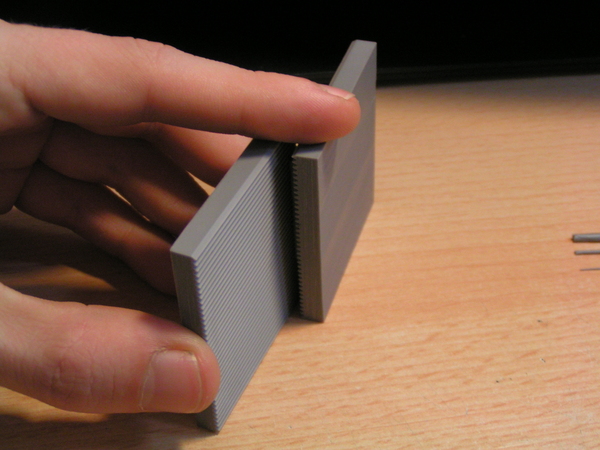
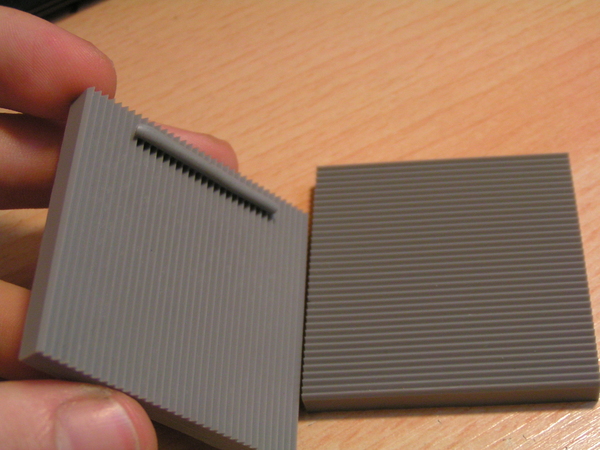
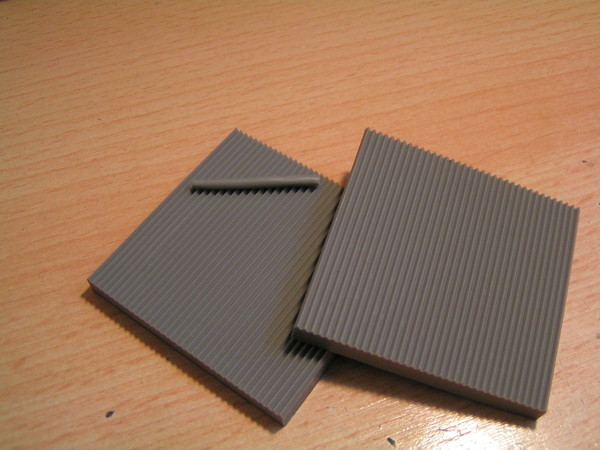
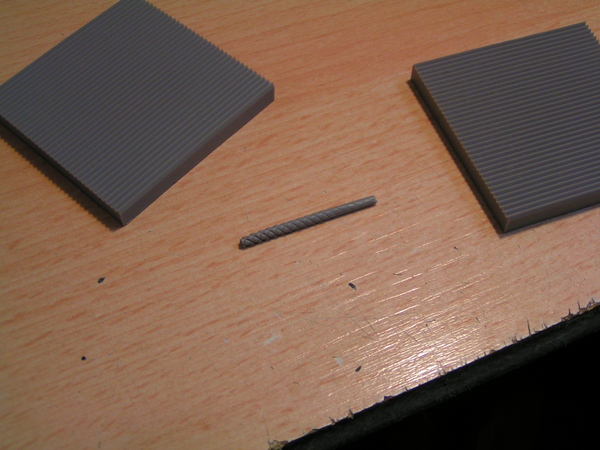
At first take yourself some putty and make a sausage, for this you can use the plain side of one of the tools to roll the putty on your working table.


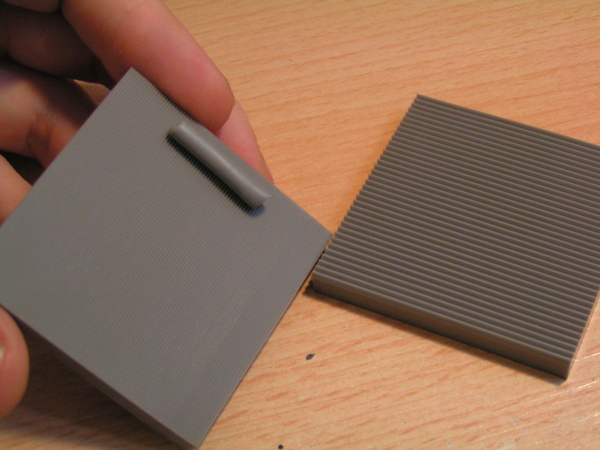
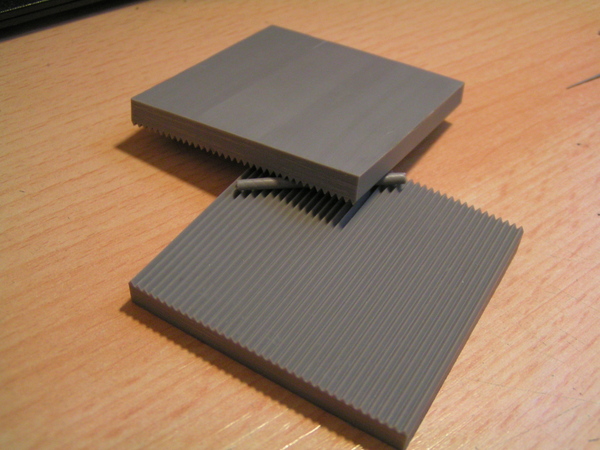
Put the sausage onto one of the sides of the tool and make sure it is perpendicular to the table ( but don't be pedantic and start measuring ).
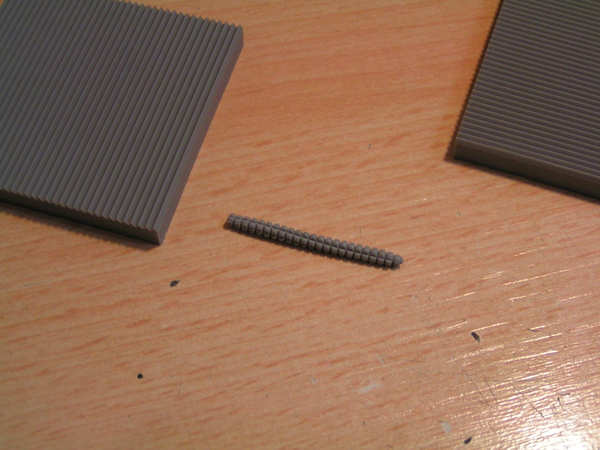
Now take the other half of the tool and start like this, make sure both tools are put plain on the table surface to achieve a very regular pattern on your tube.


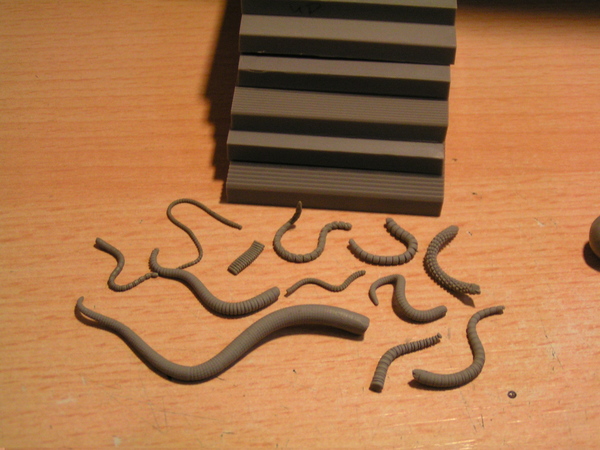
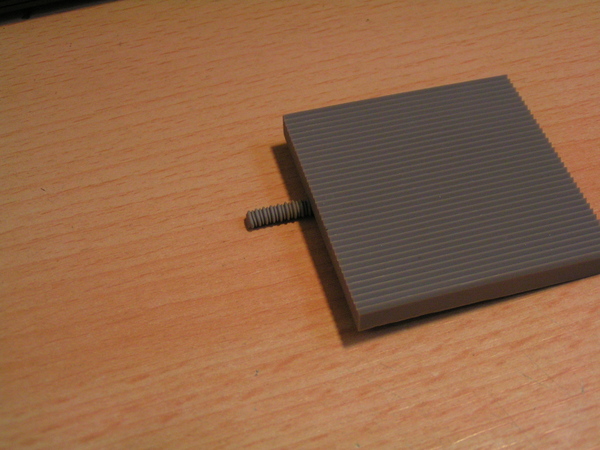
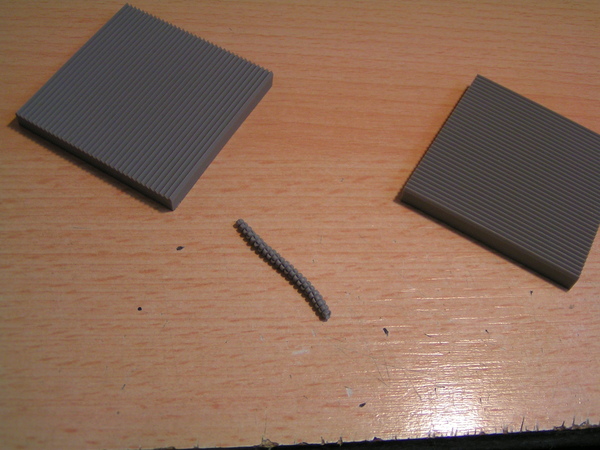
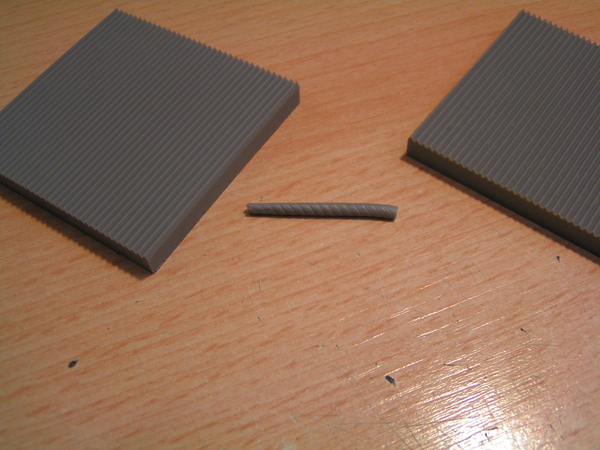
The first tube is done and you think, hmmmm I'd like to have a tube with smooth rings and no riffles in it. Well, there are two ways to do so....
You can either take the sausage you have just rolled, put it on the table and give it a soft roll with the plain side of the tool or you can take a new sausage and repeat the first step I did just with the difference that the second half of the tool will be used ith the plain side instead.


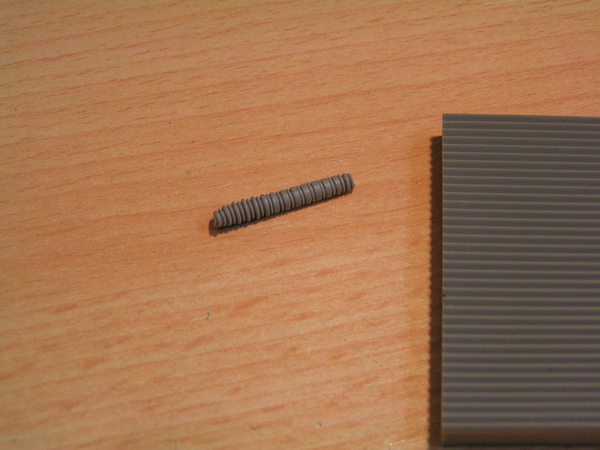
The next thing to try would be tubes that have "scales" on them. This is possible too. Just take the tool and out a little sausage into it again. The second half of the tool will now be used again but this time I will turn it around 90° and use it this way. You basically do the same as with the last tube, you only turn the second half 90° and your results will be very different. This tube can be smoothened on the table with the plain side of the tool again if you don't want it to be that pointy.

At this point you can choose to twist the tube sausage slightly with your fingers if you want to, it will look like this if you do so:


Time for some combination experiments ? Oh yes it is. The next thing I want to show you is how you can combine the three different sizes easily to achieve some grade a banana freaky tubes.
I will use the finest side and put the sausage perpendicualr to its lines and use the second half from the biggest size turned around 90° again.

Only soft pressure is applied and here is the result:


Next I will try and do some "snake chains" by simply laying one half of the tool onto the table and putting a little sausage on it in a 45 ° angle.


With the second half and it's plain side I will give it a roll going from corner to corner this time without using the table. The result is a spiral of course:


Now If you want the snake tube you will have to turn the second half around and use its riffled side. So do this again and you will get a very nice snake chain style tube out of it.


Different pressure, angles and sizes of the tool give you very different results, so go on and try it out. It is a more than awesome tool and since I have it I passed countless hours playing around with it. However this short tutorial is just touching the surface, the tool gives you way more posiibilities. Get one try it and do experiments with it. You can even put a wire into the centre of your starting sausage and after curing it will allow bending it into the right position.
Everybody who is into sci fi will love it. I know I do.

See you in the jungle !